文章目录
- 1.基础的环境准备
- 2.完全分布式 Fully-distributed
- 2.1 配置文件hase-env.sh
- 2.2 hbase-site.xml
- 2.3 配置regionservers
- 2.4 配置备用的master
- 2.5 HDFS客户端配置
- 2.6 启动
- 2.7 通过页面查看节点信息
- 3. java中客户端操作Hbase
- 3.1 引入依赖
- 3.2 初始化创建连接
- 3.3 操作Hbase数据库
- 3.3.1 创建表
- 3.3.2 往创建的user表插入数据
- 3.3.3 使用get 查询单条数据
- 3.3.4 scan 查询数据
- 3.3.5 删除数据
- 3.4 关闭连接
1.基础的环境准备
基础的环境准备不在赘述,包括jdk安装,防火墙关闭,网络配置,环境变量的配置,各个节点之间进行免密等操作等。使用的版本2.0.5.
2.完全分布式 Fully-distributed
参考官方文档
分布式的部署,都是在单节点服务的基础配置好配置,直接分发到其他节点即可。
2.1 配置文件hase-env.sh
jdk路径的配置,以及不适用内部自带的zk.
export JAVA_HOME=/usr/java/default
export HBASE_MANAGES_ZK=false
2.2 hbase-site.xml
    hbase.rootdir
    hdfs://muycluster/hbase


    hbase.cluster.distributed
    true


    hbase.zookeeper.quorum
    node02,node03,node04
2.3 配置regionservers
配置集群regionserver的节点
node02
node03
node04
2.4 配置备用的master
conf/backup-masters
vi backup-masters
node03
2.5 HDFS客户端配置
官方提供三种方式进行配置
-
Add a pointer to your HADOOP_CONF_DIR to the HBASE_CLASSPATH environment variable in hbase-env.sh.
-
Add a copy of hdfs-site.xml (or hadoop-site.xml) or, better, symlinks, under ${HBASE_HOME}/conf, or
-
if only a small set of HDFS client configurations, add them to hbase-site.xml.
一般我们都选择第二种,直接将hadoop-site.xml配置拷贝到 ${HBASE_HOME}/conf即可
2.6 启动
[root@node01 /]# start-hbase.sh
SLF4J: Class path contains multiple SLF4J bindings.
SLF4J: Found binding in [jar:file:/opt/bigdata/hbase-2.0.5/lib/slf4j-log4j12-1.7.25.jar!/org/slf4j/impl/StaticLoggerBinder.class]
SLF4J: Found binding in [jar:file:/opt/bigdata/hadoop-2.6.5/share/hadoop/common/lib/slf4j-log4j12-1.7.5.jar!/org/slf4j/impl/StaticLoggerBinder.class]
SLF4J: See http://www.slf4j.org/codes.html#multiple_bindings for an explanation.
SLF4J: Actual binding is of type [org.slf4j.impl.Log4jLoggerFactory]
running master, logging to /opt/bigdata/hbase-2.0.5/logs/hbase-root-master-node01.out
SLF4J: Class path contains multiple SLF4J bindings.
SLF4J: Found binding in [jar:file:/opt/bigdata/hbase-2.0.5/lib/slf4j-log4j12-1.7.25.jar!/org/slf4j/impl/StaticLoggerBinder.class]
SLF4J: Found binding in [jar:file:/opt/bigdata/hadoop-2.6.5/share/hadoop/common/lib/slf4j-log4j12-1.7.5.jar!/org/slf4j/impl/StaticLoggerBinder.class]
SLF4J: See http://www.slf4j.org/codes.html#multiple_bindings for an explanation.
SLF4J: Actual binding is of type [org.slf4j.impl.Log4jLoggerFactory]
node02: running regionserver, logging to /opt/bigdata/hbase-2.0.5/bin/../logs/hbase-root-regionserver-node02.out
node04: running regionserver, logging to /opt/bigdata/hbase-2.0.5/bin/../logs/hbase-root-regionserver-node04.out
node03: running regionserver, logging to /opt/bigdata/hbase-2.0.5/bin/../logs/hbase-root-regionserver-node03.out
node04: running master, logging to /opt/bigdata/hbase-2.0.5/bin/../logs/hbase-root-master-node04.out
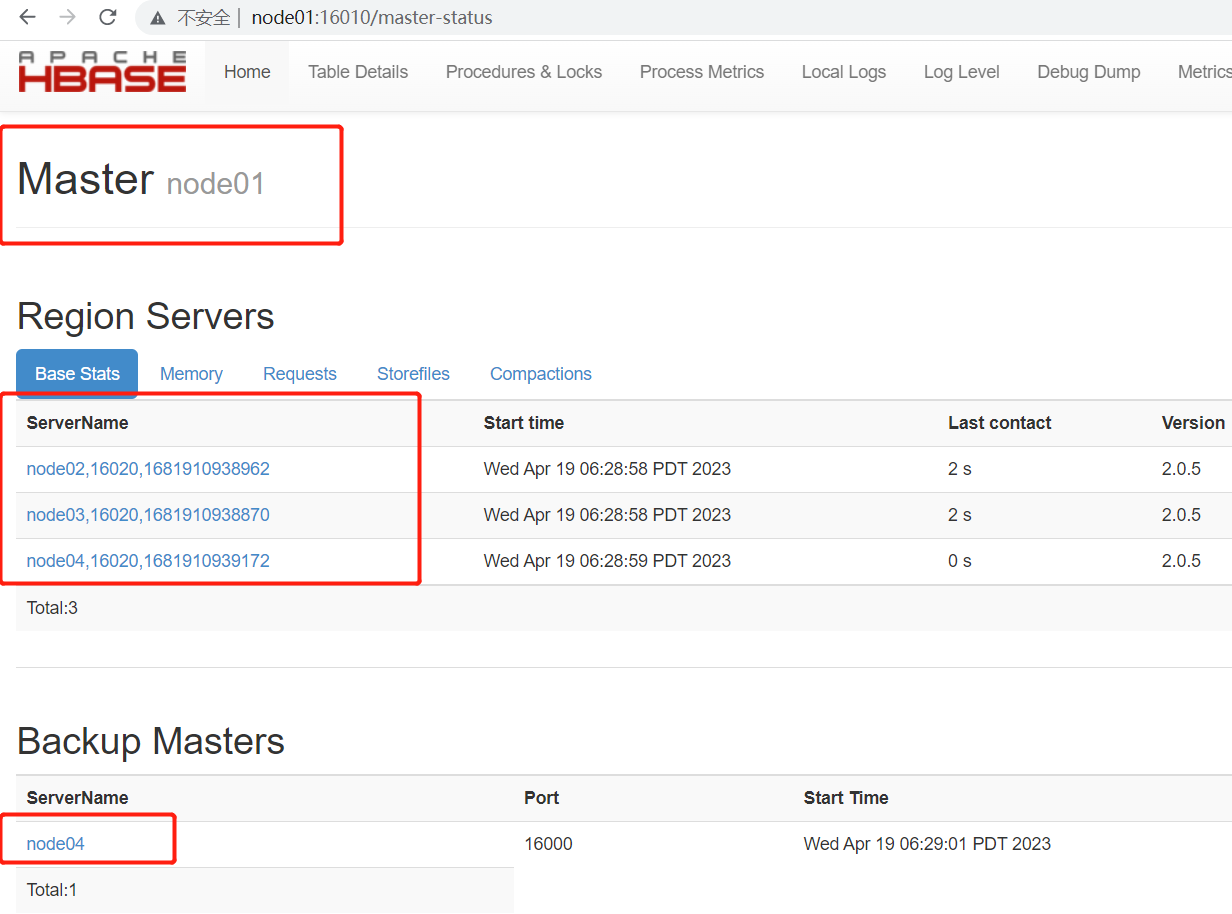
2.7 通过页面查看节点信息
访问端口16010:http://node01:16010/master-status

3. java中客户端操作Hbase
3.1 引入依赖
      org.apache.hbase
      hbase-client
      2.0.5


      org.apache.hbase
      hbase-mapreduce
      2.0.5
3.2 初始化创建连接
操作表Java API中主要提供了一个Admin对象进行表的 操作。
HBase schemas can be created or updated using the The Apache HBase Shell or by using Admin in the Java API.
   Configuration conf = null;
    Connection conn = null;
    //表的管理对象
    Admin admin = null;
    Table table = null;
    //创建表的对象
    TableName tableName = TableName.valueOf("user");
    @Before
    public void init() throws IOException {
        //创建配置文件对象
        conf = HBaseConfiguration.create();
        //加载zookeeper的配置
        conf.set("hbase.zookeeper.quorum","node02,node03,node04");
        //获取连接
        conn = ConnectionFactory.createConnection(conf);
        //获取对象
        admin = conn.getAdmin();
        //获取数据操作对象
        table = conn.getTable(tableName);
    }
3.3 操作Hbase数据库
3.3.1 创建表
 /**
     * 创建表 主要使用Admin对象进行表的创建
     * @throws IOException
     */
    @Test
    public void createTable() throws IOException {
        //定义表描述对象
        TableDescriptorBuilder tableDescriptorBuilder = TableDescriptorBuilder.newBuilder(tableName);
        //定义列族描述对象
        ColumnFamilyDescriptorBuilder columnFamilyDescriptorBuilder = ColumnFamilyDescriptorBuilder.newBuilder("cf".getBytes());
        //添加列族信息给表
        tableDescriptorBuilder.setColumnFamily(columnFamilyDescriptorBuilder.build());
        if(admin.tableExists(tableName)){
            //禁用表
            admin.disableTable(tableName);
            admin.deleteTable(tableName);
        }
        //创建表
        admin.createTable(tableDescriptorBuilder.build());
    }
3.3.2 往创建的user表插入数据
  @Test
    public void insert() throws IOException {
        Put put = new Put(Bytes.toBytes("row1"));
        put.addColumn(Bytes.toBytes("cf"),Bytes.toBytes("name"),Bytes.toBytes("elite"));
        put.addColumn(Bytes.toBytes("cf"),Bytes.toBytes("age"),Bytes.toBytes("22"));
        put.addColumn(Bytes.toBytes("cf"),Bytes.toBytes("address"),Bytes.toBytes("gz"));
        table.put(put);
    }
3.3.3 使用get 查询单条数据
 @Test
    public void get() throws IOException {
        Get get = new Get(Bytes.toBytes("row1"));
        //在服务端做数据过滤,挑选出符合需求的列
        get.addColumn(Bytes.toBytes("cf"),Bytes.toBytes("name"));
        get.addColumn(Bytes.toBytes("cf"),Bytes.toBytes("age"));
        get.addColumn(Bytes.toBytes("cf"),Bytes.toBytes("address"));
        Result result = table.get(get);
        Cell cell1 = result.getColumnLatestCell(Bytes.toBytes("cf"),Bytes.toBytes("name"));
        Cell cell2 = result.getColumnLatestCell(Bytes.toBytes("cf"),Bytes.toBytes("age"));
        Cell cell3 = result.getColumnLatestCell(Bytes.toBytes("cf"),Bytes.toBytes("address"));
        System.out.print(Bytes.toString(CellUtil.cloneValue(cell1))+" ");
        System.out.print(Bytes.toString(CellUtil.cloneValue(cell2))+" ");
        System.out.print(Bytes.toString(CellUtil.cloneValue(cell3)));
    }
3.3.4 scan 查询数据
  /**
     * 获取表中所有的记录
     */
    @Test
    public void scan() throws IOException {
        Scan scan = new Scan();
        ResultScanner rss = table.getScanner(scan);
        for (Result rs: rss) {
            Cell cell1 = rs.getColumnLatestCell(Bytes.toBytes("cf"),Bytes.toBytes("name"));
            Cell cell2 = rs.getColumnLatestCell(Bytes.toBytes("cf"),Bytes.toBytes("age"));
            Cell cell3 = rs.getColumnLatestCell(Bytes.toBytes("cf"),Bytes.toBytes("address"));
            System.out.print(Bytes.toString(CellUtil.cloneValue(cell1))+" ");
            System.out.print(Bytes.toString(CellUtil.cloneValue(cell2))+" ");
            System.out.println(Bytes.toString(CellUtil.cloneValue(cell3)));
        }
    }
3.3.5 删除数据
 /**
     * 删除数据
     * @throws IOException
     */
    @Test
    public void delete() throws IOException {
        Delete delete = new Delete("row2".getBytes());
        table.delete(delete);
    }
3.4 关闭连接
 @After
    public void close(){
        try {
            table.close();
        } catch (IOException e) {
            e.printStackTrace();
        }
        try {
            admin.close();
        } catch (IOException e) {
            e.printStackTrace();
        }
        try {
            conn.close();
        } catch (IOException e) {
            e.printStackTrace();
        }
    }
-
猜你喜欢
网友评论
- 搜索
- 最新文章
- 热门文章
