《RabbitMQ》《Spring》《SpringMVC》
文章目录
- 前言
- 一、IoC容器的简介
- BeanFactory接口源码
- 二、Bean装配
- 扫描装配
- 探索启动类
- 条件装配
- 自定义Bean
- 总结
前言
IoC((Inversion of Control,控制反转)容器是 Spring 的核心,可以说 Spring 是一种基于 IoC容器编程的框架。因为Spring Boot 是基于注解的开发 Spring IoC, 所以我们就从全注解的方式来讲诉Bean装配。
一、IoC容器的简介
Spring IoC 容器是一个管理 Bean 的容器,在 Spring 的定义中,它要求所有的 IoC 容器都需要实现接口 BeanFactory,它是一个顶级容器接口。 我们从源码讲诉。
BeanFactory接口源码
package org.springframework.beans.factory; import org.springframework.beans.BeansException; import org.springframework.core.ResolvableType; import org.springframework.lang.Nullable; public interface BeanFactory { // 前缀 String FACTORY_BEAN_PREFIX = "&"; // 多个getBean方法 Object getBean(String name) throws BeansException;T getBean(String name, Class requiredType) throws BeansException; Object getBean(String name, Object... args) throws BeansException; T getBean(Class requiredType) throws BeansException; T getBean(Class requiredType, Object... args) throws BeansException; ObjectProvider getBeanProvider(Class requiredType); ObjectProvider getBeanProvider(ResolvableType requiredType); // 是否包含Bean boolean containsBean(String name); //是否单例 boolean isSingleton(String name) throws NoSuchBeanDefinitionException; // 是否原型 boolean isPrototype(String name) throws NoSuchBeanDefinitionException; // 是否类型匹配 boolean isTypeMatch(String name, ResolvableType typeToMatch) throws NoSuchBeanDefinitionException; boolean isTypeMatch(String name, Class typeToMatch) throws NoSuchBeanDefinitionException; // 获取Bean的类型 @Nullable Class getType(String name) throws NoSuchBeanDefinitionException; // 获取Bean的别名 @Nullable Class getType(String name, boolean allowFactoryBeanInit) throws NoSuchBeanDefinitionException; String[] getAliases(String name); } 分析:
- 上诉源码中加入了中文注释,通过它们就可以理解这些方法的含义。
- 这里值得注意的是接口中的几个方法:
- 首先我们看到了多个getBean 方法,这也是IoC 容器最重要的方法之一, 它的意义是从IoC 容器中获取Bean而从多个getBean方法中可以看到有按类型(bytype)获取Bean 的,也有按名称(by name)获取 Bean 的,这就意味着在 Spring IoC 容器中,允许我们按类型或者名称获取 Bean。这对理解后面将讲到的Spring 的依赖注入(Dependency Injection, DI) 是十分重要的。
- isSingleton 方法则判断 Bean 是否在 Spring IoC 中为单例。这里需要记住的是在 Spring IoC 容器中,默认的情况下, Bean 都是以单例存在的,也就是使用 getBean 方法返回的都是同一个对象。与isSingleton 方法相反的是 isPrototype 方法,如果它返回的是 true,那么当我们使用 getBean 方法获取Bean 的时候, Spring IoC 容器就会创建一个新的 Bean 返回给调用者。
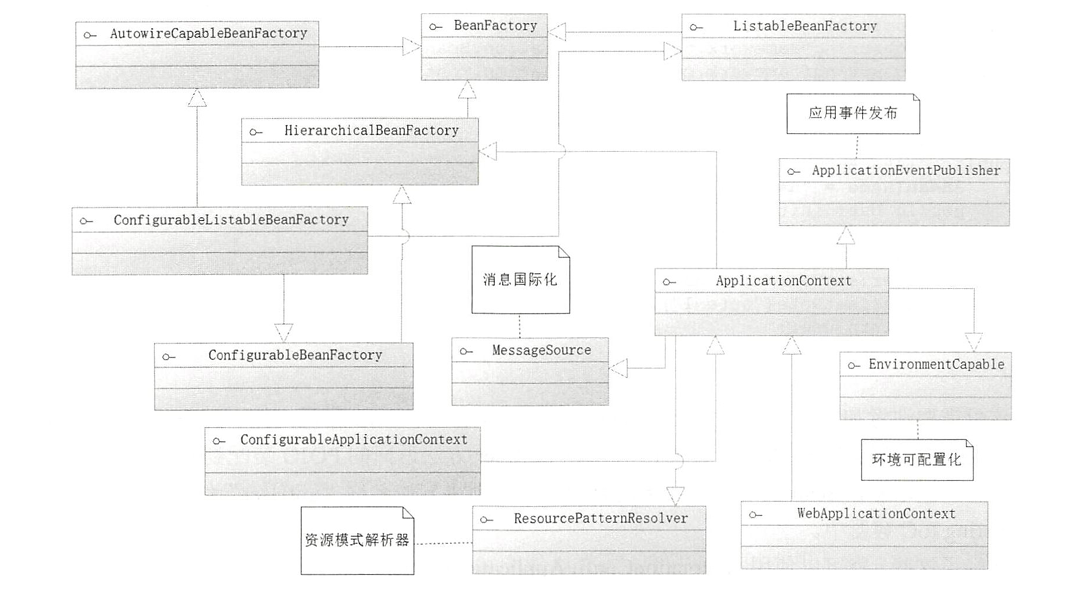
由于BeanFactory 的功能还不够强大,因此 Spring 在 BeanFactory 的基础上, 还设计了一个更为高级的接口 ApplicationContext。 它是 BeanFactory 的子接口之一, 在 Spring 的体系中 BeanFactory 和ApplicationContext 是最为重要的接口设计,在现实中我们使用的大部分 Spring IoC 容器是ApplicationContext 接口的实现类。

- 在图中可以看到, ApplicationContext 接口通过继承上级接口,进而继承 BeanFactory 接口, 但是在BeanFactory 的基础上,扩展了消息国际化接口(MessageSource)、环境可配置接口 (EnvironmentCapable)、应用事件发布接口(ApplicationEventPublish巳r) 和资源模式解析接口(ResourcePatternResolver),所以它的功能会更为强大。
- 在Spring Boot 当中我们主要是通过注解来装配Bean到 Spring IoC 容器中,为了贴近 SpringBoot 的需要, 这里不再介绍与 XML 相关的 IoC 容器,而主要介绍一个基于注解的 IoC 容器,它就是AnnotationConfigApplicationContext,从名称就可以看出它是一个基于注解的 IoC 容器。 之所以研究它, 是因为Spring Boot 装配和获取 Bean 的方法与它如出一辙。
例:创建一个User类,然后使用AnnotationConfigApplicationContext构建IoC容器
public class User {
	private Long id;
	private String userName;
/**setter and getter **/
}
import org.springframework.context.annotation.Bean; import org.springframework.context.annotation.Con f工guration ; import com.springboot.chapter3.po] o.User; @Configuration public class AppConfig { @Bean(name =”user” } public User ini tUser () { User user= new User (); user. set Id (1L) ; user.setUserName (”aa”); return user; } }@Configuration 代表这是一个 Java 配置文件, Spring 的容器会根据它来生成IoC 容器去装配Bean;@Bean 代表将 initUser 方法返回的 POJO 装配到 IoC 容器中,而其属性name 定义这个 Bean 的名称,如果没有配置它,则将方法名称“initUser”作为 Bean 的名称保存到Spring IoC 容器中。
import org.apache. log4j .Logger;
import org. springframework.context.ApplicationContext;
import org. springframework.context annotation.AnnotationConfigApplicat工onContext;
import com.springboot.chapter3.po] o .User;
public class IoCTest {
	private static Logger log= Logger.getLogger(IoCTest.class);
	publ工c static 飞roid main (String [] args) {
		ApplicationContext ctx = new AnnotationConfigAppl丰cationContext(AppConfig. class);
 		User user= ctx.getBean(User.class);
	}
}
代码中将Java 配置文件 AppConfig 传递给 AnnotationConfigApplicationContext 的构造方法,这样它就能够读取配置了。然后将配置里面的Bean装配到IoC容器中,于是可以使用 getBean方法获取对应的POJO。
二、Bean装配
扫描装配
上诉讲诉的User对象装配就是使用@Bean装配。但是如果一个个的 Bean 使用注解@Bean 注入 Spring loC 容器中,那将是一件很麻烦的事情。好在Spring 还允许我们进行扫描装配 Bean 到 loC 容器中,对于扫描装配而言使用的注解是@Component和@ComponentScan。@Component 是标明l哪个类被扫描进入 Spring IoC 容器,而ComponentScan则是标明采用何种策略去扫描装配Bean。
@Component(”user")
public class User {
	@Value("1")
	private Long id;
	@Value("aa"}
	private String userName;
/**setter and getter **/
}
这里的注解@Component表明这个类将被SpringIoC 容器扫描装配,其中配置的“user"则是作为Bean 的名称,当然你也可以不配置这个字符串,那么IoC容器就会把类名第一个字母作为小写,其他不变作为Bean 名称放入到IoC 容器中;注解@Value则是指定具体的值,使得Spring IoC给予对应的属性注入对应的值。为了让SpringIoC 容器装配这个类, 需要改造类AppConfig:
import org.springframework.context.annotat工on.ComponentScan;
import org.springframework.context.annotation Configuration;
@Configuration
@ComponentScan
public class AppConfig {
}
这里加入了@ComponentScan,意味着它会进行扫描,但是它只会扫描类AppConfig所在的当前包和其子包。也就是@ComponentScan默认扫描当前类所在包及其子包。 所以User类的位置要注意。
测试:
Applicat工onContext ctx = new AnnotationConfigApplicationContext{AppConfig.class) ;
User user= ctx.getBean(User.class);
log. info(user.getid());
为了更加合理,@ComponentScan还允许我们自定义扫描的包,我们看一下源码:
package org.springframework.context.annotation;
import java.lang.annotation.Documented;
import java.lang.annotation.ElementType;
import java.lang.annotation.Repeatable;
import java.lang.annotation.Retention;
import java.lang.annotation.RetentionPolicy;
import java.lang.annotation.Target;
import org.springframework.beans.factory.support.BeanNameGenerator;
import org.springframework.core.annotation.AliasFor;
@Retention(RetentionPolicy.RUNTIME)
@Target({ElementType.TYPE})
@Documented
//在一个类中可重复定义
@Repeatable(ComponentScans.class)
public @interface ComponentScan {
	// 定义扫描的包
    @AliasFor("basePackages")
    String[] value() default {};

	//定义扫描的包
    @AliasFor("value")
    String[] basePackages() default {};

	//定义扫描的类
    Class[] basePackageClasses() default {};

	//Bean name生成器
    Class nameGenerator() default BeanNameGenerator.class;

	//作用域解析器
    Class scopeResolver() default AnnotationScopeMetadataResolver.class;

	//作用域代理模式
    ScopedProxyMode scopedProxy() default ScopedProxyMode.DEFAULT;

	//资源匹配模式
    String resourcePattern() default "**/*.class";

	//是否启用默认的过滤器
    boolean useDefaultFilters() default true;

	//当满足过滤器的条件时扫描
    Filter[] includeFilters() default {};

	//当不满足过滤器的条件时扫描
    Filter[] excludeFilters() default {};

	//是否延迟初始化
    boolean lazyInit() default false;

	//定义过滤器
    @Retention(RetentionPolicy.RUNTIME)
    @Target({})
    public @interface Filter {
   		//过滤器类型,可以按注解类型或者正则式等过滤
        FilterType type() default FilterType.ANNOTATION;

		//定义过滤的类
        @AliasFor("classes")
        Class[] value() default {};
        @AliasFor("value")
        Class[] classes() default {};

		//匹配方式
        String[] pattern() default {};
    }
}
分析:
- 首先可以通过配置项basePackages定义扫描的包名,在没有定义的情况下,它只会扫描当前包和其子包下的路径:还可以通过basePackageClasses 定义扫描的类;
- 其中还有 includeFilters 和 excludeFilters, includeFilters 是定义满足过滤器(Filter)条件的 Bean 才去扫描, excludeFilters 则是排除过滤器条件的 Bean,它们都需要通过一个注解@Filter 去定义,它有一个type 类型,这里可以定义为注解或者正则式等类型。 classes定义注解类, pattern 定义正则式类
所以得出三个扫描路径表示:
@ComponentScan ("com.springboot.example.* ")
@ComponentScan(basePackages = {"com.springboot.example.pojo"})
@ComponentScan(basePackageClasses = {User.class} )
以及排除扫描包或类,让其不被装配:
//扫描example下所有包除了@Service装配的类
//这样,由于加入了 excludeFilters 的配置,使标注了@Service 的类将不被 IoC 容器扫描注入,这样就可以把它类排除到 Spring IoC容器中了。
@ComponentScan(basePackages = {"com.dragon.restart"},excludeFilters = {@ComponentScan.Filter(classes = Service.class)})
探索启动类
事实上,之前在 Spring Boot 的注解@SpringBootApplication 也注入了@ComponentScan,这里不妨探索其源码:
@Target({ElementType.TYPE})
@Retention(RetentionPolicy.RUNTIME)
@Documented
@Inherited
@SpringBootConfiguration
@EnableAutoConfiguration
//自定义排除的扫描类
@ComponentScan(
    excludeFilters = {@Filter(
    type = FilterType.CUSTOM,
    classes = {TypeExcludeFilter.class}
), @Filter(
    type = FilterType.CUSTOM,
    classes = {AutoConfigurationExcludeFilter.class}
)}
)
public @interface SpringBootApplication {
	//通过类型排除自动配置
    @AliasFor(
        annotation = EnableAutoConfiguration.class
    )
    Class[] exclude() default {};
	//通过名称排除自动配置类
    @AliasFor(
        annotation = EnableAutoConfiguration.class
    )
    String[] excludeName() default {};
	//定义扫描包
    @AliasFor(
        annotation = ComponentScan.class,
        attribute = "basePackages"
    )
    String[] scanBasePackages() default {};
	//定义被扫描的类
    @AliasFor(
        annotation = ComponentScan.class,
        attribute = "basePackageClasses"
    )
    Class[] scanBasePackageClasses() default {};
显然,通过它就能够定义扫描哪些包。但是这里需要特别注意的是,它提供的exclude和excludeName两个方法是对于其内部的自动配置类才会生效的。为了能够排除其他类,还可以再加入@ComponentScan以达到我们的目的。
条件装配
- 例如在数据库连接池的配置中漏掉一些配置会造成数据源不能连接上。 在这样的情况下, IoC容器如果还进行数据源的装配, 则系统将会抛出异常,导致应用无法继续。这时倒是希望IoC容器不去装配数据源。
- 为了处理这样的场景, Spring 提供了@Conditional注解帮助我们,而它需要配合另外一个接口Condition(org.springframework.context.annotation.Condition )来完成对应的功能。
装配的Bean:
@Bean(name = "dataSource", destroyMethod = "close" )
@Conditional(DatabaseConditional.class)
public DataSource getDataSource (
@Value("${database.driverName}") String driver,
@Value("${database.url}") String url,
@Value("${database.username}") String username,
@Value("{database.password}") String password
){
	Properties props= new Properties();
	props.setProperty("driver", driver);
	props setProperty("url", url);
	props.setProperty("username", username);
	props setProperty("password", password);
	DataSource dataSource = null;
	try {
		dataSource = BasicDataSourceFactory.createDataSource(props) ;
	) catch (Exception e) {
		e.printStackTrace();
	}
	return dataSource;
}
自定义DatabaseConditional类:
public class DatabaseConditional implements Condition {
/**
* 数据库装配条件
*
* @param context 条件上下文
* @param metadata 注释类型的元数据
* @return true 装配 Bean,否则不装配
*/
@Override
public boolean matches(ConditionContext context, AnnotatedTypeMetadata metadata) {
	//取出环境配置
	Environment env = context.getEnvironment();
	//判断属性文件是否存在对应的数据库配置
	return env.containsProperty(”database.driverName” )
		&& env.containsProperty(”database.url”)
		&& env.containsProperty(” database.username”)
		&& env.containsProperty (”database.password");
matches 方法首先读取其上下文环境, 然后判定是否已经配置了对应的数据库信息。这样,当这些都己经配置好后则返回true。这个时候Spring会装配数据库连接池的Bean,否则是不装配的。
自定义Bean
- 现实的Java 的应用往往需要引入许多来自第三方的包, 并且很有可能希望把第三方包的类对象也放入到Spring IoC 容器中,这时@Bean注解就可以发挥作用了。
- 例如,要引入一个DBCP数据源,我们先在pom.xml上加入项目所需要DBCP包和数据库MySQL驱动程序的依赖。
	org.apache.commons
	commons-dbcp2


	mysql
	mysql-connector-ava
这样 DBCP 和数据库驱动就被加入到了项目中,接着将使用它提供的机制来生成数据源:
@Bean(name = "dataSource")
@Conditional(DatabaseConditional.class)
public DataSource getDataSource (){
	Properties props= new Properties();
	props.setProperty("driver", driver);
	props setProperty("url", url);
	props.setProperty("username", username);
	props setProperty("password", password);
	DataSource dataSource = null;
	try {
		dataSource = BasicDataSourceFactory.createDataSource(props) ;
	) catch (Exception e) {
		e.printStackTrace();
	}
	return dataSource;
}
这里通过@Bean 定义了其配置项 name 为“dataSource“,那么 Spring 就会把它返回的对象用名称“dataSource” 保存在 loC 容器中。当然, 你也可以不填写这个名称,那么它就会用你的方法名称作为Bean 名称保存到 IoC 容器中。通过这样,就可以将第三方包的类装配到SpringIoC容器中了。
总结
以上就是SpringBoot的Bean装配的详细讲解。
猜你喜欢
网友评论
- 搜索
- 最新文章
- 热门文章
