文章目录
- 1. 数据结构
- 1) hw_module_t
- 2) hw_module_methods_t
- 3) hw_device_t
- 2. 程序编写
- 3. 编译程序
- 4. 验证程序
- 5. 添加权限
- 1) 设备节点添加权限
- 2) 添加 shell linux 权限
作者: baron
对 linux 驱动程序进行封装,其主要设计意图是向下屏蔽设备以及其驱动的实现细节,向上为系统服务以及 Framework 提供提供统一的设备访问接口。就是 linux 驱动只提供硬件读写接口, 业务逻辑通过 hall 封装成 so 库. 这样就不用遵循 kernel 的 gpl 开源协议, 从而保护厂商的利益. 不过也因为这个原因安卓被 linux 踢出了内核主线程.
1. 数据结构
1) hw_module_t
用来表示硬件的抽象
- 每一个模块都必须自定义一个硬件抽象层模块结构体,而且他的第一个成员变量的类型必须为 hw_module_t.
- 硬件抽象层每一个模块都必须声明为HAL_MODULE_INFO_SYM
- 结构体 hw_module_t的成员变量 tag的值必须设置为HARDWARE_MODULE_TAG
- dso 用来保存加载硬件抽象层模块后得到的句柄值.
// libhardware/include/hardware/hardware.h
typedef struct hw_module_t {
    uint32_t tag;  // 值必须声明为 HARDWARE_MODULE_TAG
    uint16_t module_api_version;     // 模块 API 版本
#define version_major module_api_version
    uint16_t hal_api_version;        // HAL API 版本
#define version_minor hal_api_version
    const char *id;       // 模块的唯一标识符, 通过该标识符查找该 module
    const char *name;     // 模块的名称
    const char *author;   // 模块的作者
    struct hw_module_methods_t* methods;  // 模块的方法集合
    void* dso;  // 模块的共享对象(动态共享库)
#ifdef __LP64__
    uint64_t reserved[32-7];  // 保留字段,64 位系统上使用 64 位整数数组
#else
    uint32_t reserved[32-7];  // 保留字段,32 位系统上使用 32 位整数数组
#endif
} hw_module_t;
2) hw_module_methods_t
封装 open 函数, 通过 open 函数获取 hw_device_t
// libhardware/include/hardware/hardware.h
typedef struct hw_module_methods_t {
    int (*open)(const struct hw_module_t* module, const char* id,
            struct hw_device_t** device);
} hw_module_methods_t;
3) hw_device_t
open 函数返回的结构, 硬件设备结构的第一个结构.
- tag的值必须设置为HARDWARE_DEVICE_TAG
- close 回调接口用来关闭设备
// libhardware/include/hardware/hardware.h
typedef struct hw_device_t {
    uint32_t tag;               // 赋值为 HARDWARE_DEVICE_TAG
    uint32_t version;           // 版本号
    struct hw_module_t* module; // 属于哪个 hw_module_t
#ifdef __LP64__
    uint64_t reserved[12];
#else
    uint32_t reserved[12];
#endif
    int (*close)(struct hw_device_t* device); // close 方法
} hw_device_t;
有了这几个接口就可以用来封装我们驱动接口了.
2. 程序编写
创建头文件: hardware/libhardware/include/hardware/hello.h内容如下.
// include/hardware/hello.h
#ifndef ANDROID_INCLUDE_HARDWARE_HELLO_H
#define ANDROID_INCLUDE_HARDWARE_HELLO_H
#include
#include
#include
#include
#include
#include
#define HELLO_HARDWARE_MODULE_ID "hello"
// 创建一个 hello_module_t 类用来描述硬件的抽象
// 它的第一个结构必须是 hw_module_t
// 它必须被实例化为 HAL_MODULE_INFO_SYM
typedef struct hello_module {
    struct hw_module_t common;
}hello_module_t;
// 硬件设备结构 hello_device
// 它的第一个结构必须为 hw_device_t, 因为这样就可以通过 hw_device_t 拿到 hello_device
typedef struct hello_device {
    struct hw_device_t common;
    int fd;
    int (*write_string)(struct hello_device* dev, const char *str);
    int (*read_string)(struct hello_device* dev, char* str);
}hello_device_t;
#endif /* ANDROID_INCLUDE_HARDWARE_HELLO_H  */
创建 hardware/libhardware/modules/hello/hello.c文件
// hardware/libhardware/modules/hello/hello.c`
#define LOG_TAG "Legacy HelloHAL"
#include
#include
#include
#include
#include
#include
#include
#include
#include
#include
#include
#include
#include
#define DEVICE_NAME "/dev/hello"
#define MODULE_NAME "Default Hello HAL"
#define MODULE_AUTHOR "The Android Open Source Project"
// 接口声明
static int hello_device_open(const struct hw_module_t* module, const char* name, struct hw_device_t** device);
static int hello_device_close(struct hw_device_t* device);
static int hello_write_string(struct hello_device* dev, const char * str);
static int hello_read_string(struct hello_device* dev, char* str);
// 创建 hw_module_methods_t 用来提供 open 方法
static struct hw_module_methods_t hello_module_methods = {
    .open = hello_device_open,
};
// 实例化 hello_module_t 硬件抽象模块为 HAL_MODULE_INFO_SYM
// ******** 必须实例化为 HAL_MODULE_INFO_SYM 这个名字不能变
hello_module_t HAL_MODULE_INFO_SYM = {
    .common = {
        .tag = HARDWARE_MODULE_TAG, // 必须设置为这个 tag
        .module_api_version = 1,
        .hal_api_version = 1,
        .id = HELLO_HARDWARE_MODULE_ID, // 通过这个查找对应的 moduel
        .name = MODULE_NAME,
        .author = MODULE_AUTHOR,
        .methods = &hello_module_methods, // 设置 open 方法
    },
};
// open 方法的具体实现
static int hello_device_open(const struct hw_module_t* module, const char* name, struct hw_device_t** device)
{
    // 创建一个 hello_device_t 结构
    hello_device_t *dev = malloc(sizeof(hello_device_t));
    memset(dev, 0, sizeof(hello_device_t));
    ALOGE("Hello: hello_device_open name = %s",name);
    dev->common.tag = HARDWARE_DEVICE_TAG; // 必须设置为 HARDWARE_DEVICE_TAG
    dev->common.version = 0;
    dev->common.module = (hw_module_t*)module; // 设置 module
    dev->common.close = hello_device_close;    // 设置关闭设备接口
    dev->write_string = hello_write_string;    // 设置 write 方法
    dev->read_string = hello_read_string;      // 设置 read 方法
    // 打开设备
    if((dev->fd = open(DEVICE_NAME, O_RDWR)) == -1) {
        ALOGE("Hello: open /dev/hello fail-- %s.", strerror(errno));free(dev);
        return -EFAULT;
    }
    // 返回 hw_device_t 结构
    *device = &(dev->common);
    ALOGE("Hello: open /dev/hello successfully.");
    return 0;
}
// 关闭设备释放资源
static int hello_device_close(struct hw_device_t* device)
{
    // 通过 device 可以拿到 hello_device
    struct hello_device* hello_device = (struct hello_device*)device;
    if(hello_device) {
        close(hello_device->fd);
        free(hello_device);
    }
    return 0;
}
// 写方法实现
static int hello_write_string(struct hello_device* dev,const char * str)
{
    ALOGE("Hello:write string: %s", str);
    write(dev->fd, str, sizeof(str));
    return 0;
}
// 读方法实现
static int hello_read_string(struct hello_device* dev, char* str)
{
    ALOGE("Hello:read hello_read_string");
    read(dev->fd,str, sizeof(str));
    return 0;
}
3. 编译程序
创建 hardware/libhardware/modules/hello/Android.bp添加内容如下.
cc_library_shared {
    name: "hello.default",
    relative_install_path: "hw",
    proprietary: true,
    srcs: ["hello.c"],
    cflags: ["-Wall", "-Werror"],
    header_libs: ["libhardware_headers"],
    shared_libs: [
        "liblog",
        "libcutils",
        "libutils",
    ],
}
在 build/make/target/product/full_base.mk中添加如下内容, 将我们的添加的 hall 库编译进系统.对应的位置为 /vendor/lib/hw/hello.default.so.
diff --git a/target/product/full_base.mk b/target/product/full_base.mk
index ffd3cde11a..9f7270bd2f 100644
-- a/target/product/full_base.mk
++ b/target/product/full_base.mk
@@ -32,7 +32,8 @@ PRODUCT_PACKAGES += \
 #   audio.a2dp.default is a system module. Generic system image includes
 #   audio.a2dp.default to support A2DP if board has the capability.
 PRODUCT_PACKAGES += \
-    audio.a2dp.default
+    audio.a2dp.default \
+       hello.default
运行 ./build.sh -UKAup编译代码. 编译完成之后可以在 out 目录下发现 hello.default
$ find out/ -name "hello\.default"
out/soong/.intermediates/hardware/libhardware/modules/hello/hello.default
4. 验证程序
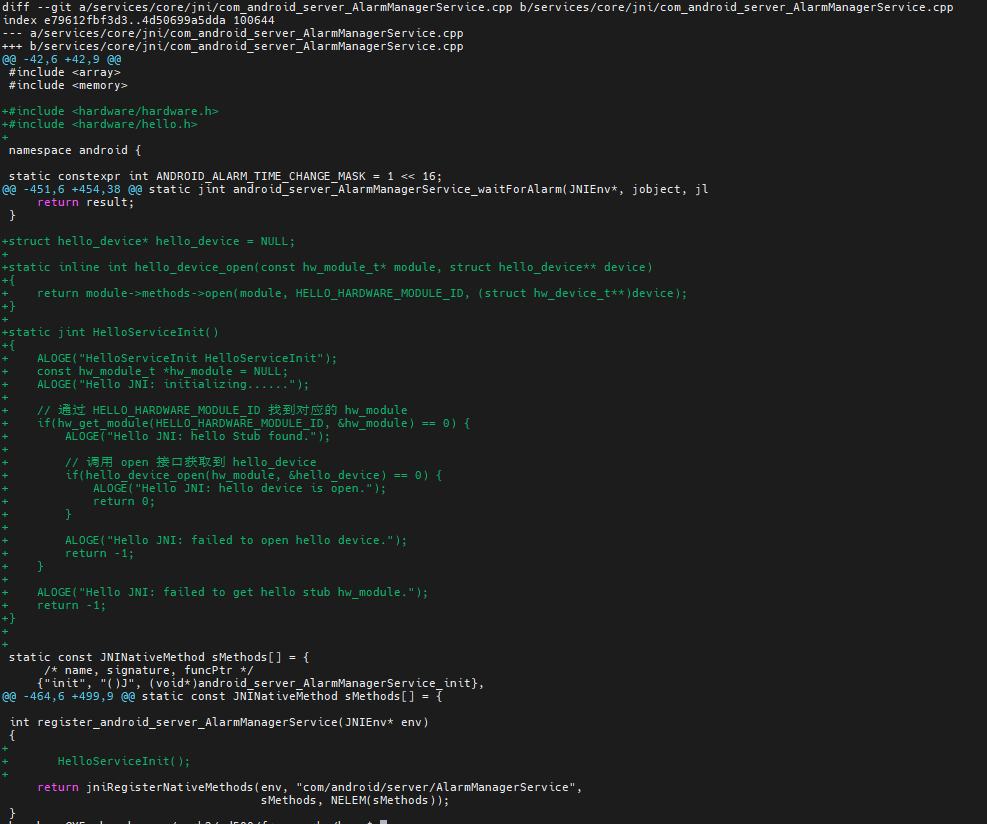
添加验证代码 frameworks/base/services/core/jni/com_android_server_AlarmManagerService.cpp修改如下

对应代码
#include
#include
struct hello_device* hello_device = NULL;
 static inline int hello_device_open(const hw_module_t* module, struct hello_device** device)
{
     return module->methods->open(module, HELLO_HARDWARE_MODULE_ID, (struct hw_device_t**)device);
 }
static jint HelloServiceInit()
{
    ALOGE("HelloServiceInit HelloServiceInit");
    const hw_module_t *hw_module = NULL;
    ALOGE("Hello JNI: initializing......");
    // 通过 HELLO_HARDWARE_MODULE_ID 找到对应的 hw_module
    if(hw_get_module(HELLO_HARDWARE_MODULE_ID, &hw_module) == 0) {
        ALOGE("Hello JNI: hello Stub found.");
        // 调用 open 接口获取到 hello_device
        if(hello_device_open(hw_module, &hello_device) == 0) {
          ALOGE("Hello JNI: hello device is open.");
          return 0;
        }
        ALOGE("Hello JNI: failed to open hello device.");
        return -1;
    }
    ALOGE("Hello JNI: failed to get hello stub hw_module.");
    return -1;
}
修改 system/sepolicy/vendor/file_contexts添加库的位置让系统能够找到, 该正则表达式指定了库的位置为 /vendor/lib64/hw/hello.default.so
diff --git a/vendor/file_contexts b/vendor/file_contexts
index 1b2bc2357..92c166b6c 100644
-- a/vendor/file_contexts
++ b/vendor/file_contexts
@@ -86,6 +86,7 @@
 /(vendor|system/vendor)/lib(64)?/hw/android\.hardware\.graphics\.mapper@4\.0-impl\.so u:object_r:same_process_hal_file:s0
 /(vendor|system/vendor)/lib(64)?/hw/android\.hardware\.renderscript@1\.0-impl\.so     u:object_r:same_process_hal_file:s0
 /(vendor|system/vendor)/lib(64)?/hw/gralloc\.default\.so                              u:object_r:same_process_hal_file:s0
+/(vendor|system/vendor)/lib(64)?/hw/hello\.default\.so                                u:object_r:same_process_hal_file:s0
刷机开机打印 log 如下
01-18 07:32:55.775   419   419 E AlarmManagerService: HelloServiceInit HelloServiceInit
01-18 07:32:55.776   419   419 E AlarmManagerService: Hello JNI: initializing......
01-18 07:32:55.778   419   419 E AlarmManagerService: Hello JNI: hello Stub found.
01-18 07:32:55.778   419   419 E Legacy HelloHAL: Hello: hello_device_open name = hello
01-18 07:32:55.778   419   419 E Legacy HelloHAL: Hello: open /dev/hello fail-- Permission denied.
01-18 07:32:55.778   419   419 E AlarmManagerService: Hello JNI: failed to open hello device.
提示没没有权限
5. 添加权限
1) 设备节点添加权限
给我们的设备节点添加权限修改路径 system/core/rootdir/如下
diff --git a/rootdir/ueventd.rc b/rootdir/ueventd.rc
index 1550894ce..428cc1ec2 100644
-- a/rootdir/ueventd.rc
++ b/rootdir/ueventd.rc
@@ -39,6 +39,7 @@ subsystem sound
 /dev/vndbinder            0666   root       root
 /dev/pmsg0                0222   root       log
+/dev/hello                0666   root       root
 # kms driver for drm based gpu
 /dev/dri/*                0666   root       graphics
添加权限之后报错如下
01-17 09:52:50.271   265   265 E MtpDeviceJNI: HelloServiceInit HelloServiceInit
01-17 09:52:50.272   265   265 E MtpDeviceJNI: Hello JNI: initializing......
// 多了这个信息需要增加 selinux 权限
01-17 09:52:50.276   265   265 W main    : type=1400 audit(0.0:17): avc: denied { read write } for name="hello" dev="tmpfs" ino=11079 scontext=u:r:zygote:s0 tcontext=u:object_r:device:s0 tclass=chr_file permissiv
e=0
01-17 09:52:50.280   265   265 E MtpDeviceJNI: Hello JNI: hello Stub found.
01-17 09:52:50.280   265   265 E Legacy HelloHAL: Hello: hello_device_open name = hello
01-17 09:52:50.281   265   265 E Legacy HelloHAL: Hello: open /dev/hello fail-- Permission denied.
01-17 09:52:50.281   265   265 E MtpDeviceJNI: Hello JNI: failed to open hello device.
2) 添加 shell linux 权限
- 在 system/sepolicy/public/device.te中添加类别为 hello_device 的对象, 并且设置 attribute 为 dev_type. 修改如下
diff --git a/public/device.te b/public/device.te
index 32563d67c..cc6fc2881 100644
-- a/public/device.te
++ b/public/device.te
@@ -39,6 +39,7 @@ type serial_device, dev_type;
 type socket_device, dev_type;
 type owntty_device, dev_type, mlstrustedobject;
 type tty_device, dev_type;
+type hello_device, dev_type;
 type video_device, dev_type;
 type zero_device, dev_type, mlstrustedobject;
 type fuse_device, dev_type, mlstrustedobject;
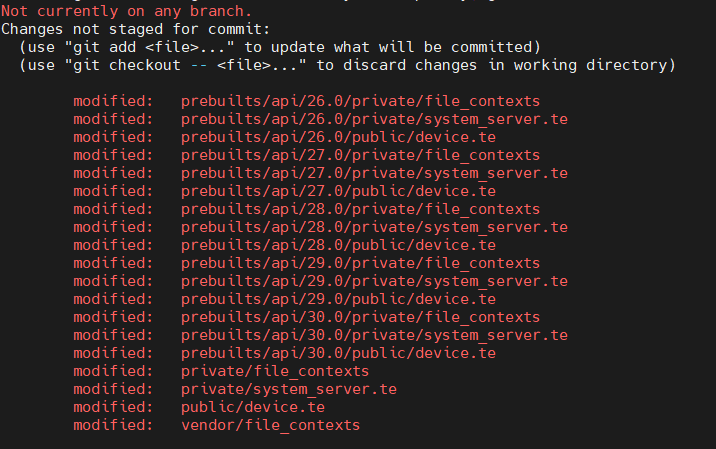
修改的文件如下,修改的内容和上面是一样的.:

- 将 /dev/hello 设备节点和 SELinux 类别为 hello_device 的对象进行关联, 即我们前面创建的. 如下所示
zhaosheng@YF-zhaosheng:~/work2/ad500/system/sepolicy$ gf private/file_contexts
diff --git a/private/file_contexts b/private/file_contexts
index a5763bdf4..4475b1598 100755
-- a/private/file_contexts
++ b/private/file_contexts
@@ -102,6 +102,7 @@
 /dev/input(/.*)?       u:object_r:input_device:s0
 /dev/iio:device[0-9]+   u:object_r:iio_device:s0
 /dev/ion               u:object_r:ion_device:s0
+/dev/hello             u:object_r:hello_device:s0
 /dev/keychord   u:object_r:keychord_device:s0
 /dev/loop-control      u:object_r:loop_control_device:s0
 /dev/modem.*           u:object_r:radio_device:s0
- /dev/hello:表示规则适用于 /dev/hello这个设备节点
- u:object_r:hello_device:s0:指定 SELinux 上下文,hello_device是 SELinux 类别,s0表示 SELinux 安全等级为 0
需要修改的文件如下, 修改的内容和上面是一模一样的.

编译完成后报错如下
01-18 07:07:17.681 421 421 E AlarmManagerService: HelloServiceInit HelloServiceInit 01-18 07:07:17.681 421 421 E AlarmManagerService: Hello JNI: initializing...... 01-18 07:07:17.683 421 421 W system_server: type=1400 audit(0.0:17): avc: denied { read write } for name="hello" dev="tmpfs" ino=3901 scontext=u:r:system_server:s0 tcontext=u:object_r:hello_device:s0 tclass=c hr_file permissive=0 01-18 07:07:17.683 421 421 E AlarmManagerService: Hello JNI: hello Stub found. 01-18 07:07:17.683 421 421 E Legacy HelloHAL: Hello: hello_device_open name = hello 01-18 07:07:17.683 421 421 E Legacy HelloHAL: Hello: open /dev/hello fail-- Permission denied. 01-18 07:07:17.683 421 421 E AlarmManagerService: Hello JNI: failed to open hello device. 01-18 07:07:17.685 421 421 E UsbAlsaJackDetectorJNI: Can't register UsbAlsaJackDetector na- 增加 avc 权限
关键信息是这句话缺少 avc 权限, 请注意前面的报错是 tcontext=u:object_r:device这里是 tcontext=u:object_r:hello_device说前面的 hello_device 修改已经生效.
01-18 07:07:17.683 421 421 W system_server: type=1400 audit(0.0:17): avc: denied { read write } for name="hello" dev="tmpfs" ino=3901 scontext=u:r:system_server:s0 tcontext=u:object_r:hello_device:s0 tclass=c hr_file permissive=0- 缺少什么权限: denied { read write }==> 缺少 rw_file_perms权限
- 那个文件缺少权限: scontext=u:r:system_server:s0==> system_server.te这个文件
- 谁缺少权限: tcontext=u:object_r:hello_device:s0==> hello_device这个对象
- 文件类型: tclass=chr_file ==> chr_file字符设备
这里的知识详细请参考: 浅谈SEAndroid安全机制及应用方法
于是在 system/sepolicy/private/system_server.te增加
diff --git a/private/system_server.te b/private/system_server.te
index 3c1d192d7..d742471b1 100644
-- a/private/system_server.te
++ b/private/system_server.te
@@ -372,6 +372,7 @@ allow system_server video_device:chr_file rw_file_perms;
 allow system_server adbd_socket:sock_file rw_file_perms;
 allow system_server rtc_device:chr_file rw_file_perms;
 allow system_server audio_device:dir r_dir_perms;
+allow system_server hello_device:chr_file rw_file_perms;
 # write access to ALSA interfaces (/dev/snd/*) needed for MIDI
 allow system_server audio_device:chr_file rw_file_perms;
修改的文件如下, 修改的内容和上面是一样的.

修改完成之后再次烧录验证查看 log, 正常发现设备正常打开 hall 层添加成功. 真不容易啊 =-=.
01-18 07:44:49.688   415   415 E AlarmManagerService: HelloServiceInit HelloServiceInit
01-18 07:44:49.688   415   415 E AlarmManagerService: Hello JNI: initializing......
01-18 07:44:49.690   415   415 E AlarmManagerService: Hello JNI: hello Stub found.
01-18 07:44:49.691   415   415 E Legacy HelloHAL: Hello: hello_device_open name = hello
01-18 07:44:49.691   415   415 E Legacy HelloHAL: Hello: open /dev/hello successfully.
01-18 07:44:49.691   415   415 E AlarmManagerService: Hello JNI: hello device is open.
验证 hall 需要修改的 selinux 相关文件如下. 全部都要改到不要偷懒.

参考文章:
https://blog.csdn.net/Luoshengyang/article/details/6567257
https://developer.aliyun.com/article/651348
猜你喜欢
网友评论
- 搜索
- 最新文章
- 热门文章
