前言
-
嵌入式Linux 设备驱动开发时,经常遇到平台驱动 platform_driver_register 的注册,最近深入了看了驱动开发为何使用平台驱动
-
开发一个设备驱动时,为了实现 设备的 打开、关闭、控制等操作,可以注册为 Linux misc 设备,不过在这之前,可以先使用 platform_driver_register 注册平台驱动,在平台驱动 probe 函数中,初始化调用 misc 设备的注册操作
-
platform driver 在设备驱动开发中,到底起到了什么作用?为何不直接注册一个实际的设备,如 misc 【字符设备】?
Linux 驱动模型
-
仔细研究了一下,发现当前较新的Linux 内核版本,使用了【设备树】,这里注册的不是平台设备,而是平台的驱动,好处就是平台驱动在注册时,会自动匹配设备节点,匹配成功后,就会调用用户注册平台驱动时的 probe函数,匹配失败,就不会调用 probe函数。
-
利用平台驱动的这个机制,在设备匹配成功再去注册设备,那么注册实际的设备的操作放在平台驱动 probe 中调用,再适合不过了,如根据设备树觉得是否需要注册一个 misc 字符设备,如果匹配失败,那这个设备不存在,就无须注册,匹配成功,说明设备存在,就会在 probe 中注册设备。
-
如果只是为了匹配设备树,自己写个 match 函数就可以吧,为何还要注册平台驱动这么麻烦?其实平台驱动本身一点都不麻烦,相反如果自己去拿个【设备节点名称】去匹配设备树,才会比较的麻烦,也就是说,注册了平台驱动,这个匹配操作就自动完成了,不需要用户写一些匹配设备树的操作函数手动去匹配了。
-
注册了平台驱动,设备驱动如果是【模块编译】的,在移除设备驱动模块时,平台驱动remove 函数会自动调用 ,这样可以在 remove 函数中做些设备释放的相关操作
-
如此看来,注册平台驱动,简化了设备驱动的开发,交给内核驱动模型去管理设备驱动,带来了很多的便利
测试环境搭建
-
ubuntu 20.04
-
VMware Workstation Pro 16
-
基于qemu(模拟器),vexpress-a9 平台
-
Linux 6.0.10 (当前最新版本)
-
注册一个简单的平台驱动,掌握平台驱动注册的方法
注册Linux 平台驱动示例
-
在Linux 内核 目录: linux-6.0.10/drivers 下创建 led_control 文件夹,当前 qemu 环境,无法控制具体的引脚,这里只作为示例,也可以实际的开发板验证
-
新建 linux-6.0.10/drivers/led_control/led_control.c
#include "led_control.h" #define LED_CONTROL_DRIVER_NAME "led_control" static int led_control_probe(struct platform_device *pdev); static int led_control_remove(struct platform_device *pdev); static void led_control_shutdown(struct platform_device *pdev); /* 设备树匹配:这里的节点,在相应的 dts 设备树文件中添加 */ static const struct of_device_id led_control_of_match[] = { { .compatible = "gpio,led,led-control", }, }; /* 平台驱动 : 核心是 probe函数,设备树匹配后,会调用 probe */ static struct platform_driver led_control_driver = { .probe = led_control_probe, .remove = led_control_remove, .shutdown = led_control_shutdown, .driver = { .name = LED_CONTROL_DRIVER_NAME, .of_match_table = of_match_ptr(led_control_of_match), }, }; static int led_control_probe(struct platform_device *pdev) { printk(KERN_INFO "%s : enter\n", __func__); // led_miscdev_init(); /* 设备存在就会进入这里,注册 misc 设备 */ return 0; } static int led_control_remove(struct platform_device *pdev) { printk(KERN_INFO "%s : enter\n", __func__); //led_miscdev_exit(); /* 移除设备驱动模块时,反注册 misc 设备 */ return 0; } static void led_control_shutdown(struct platform_device *pdev) { printk(KERN_INFO "%s : enter\n", __func__); } static int __init led_control_driver_init(void) { printk(KERN_INFO "%s : enter\n", __func__); return platform_driver_register(&led_control_driver); } late_initcall(led_control_driver_init); /* 自动初始化机制:开机后会调用 */ static void __exit led_control_driver_exit(void) { printk(KERN_INFO "%s : enter\n", __func__); platform_driver_unregister(&led_control_driver); } module_exit(led_control_driver_exit); /* 移除驱动模块时会调用 */ MODULE_AUTHOR("zhangsz"); MODULE_DESCRIPTION("led control driver"); MODULE_LICENSE("GPL");- 新建 linux-6.0.10/drivers/led_control/led_control.h
#ifndef __LED_CONTROL_H__ #define __LED_CONTROL_H__ #include
#include //#include "led_misc.h" #endif - 新建 linux-6.0.10/drivers/led_control/Kconfig,这里增加一个【宏】
config LED_CONTROL
	tristate "Support LED Control"
	help
		Enable LED Control driver
	default y
- 新建 linux-6.0.10/drivers/led_control/Makefile,Linux 下,默认使用 Makefile 管理文件的编译
obj-$(CONFIG_LED_CONTROL) += led_control.o
其他修改
- 虽然 led_control 驱动里面Kconfig 默认选中 【default y】,但是 menuconfig 中找不到这个 Kconfig 配置,需要修改 linux-6.0.10/drivers/Kconfig,把 led_control 的 Kconfig 路径添加进去
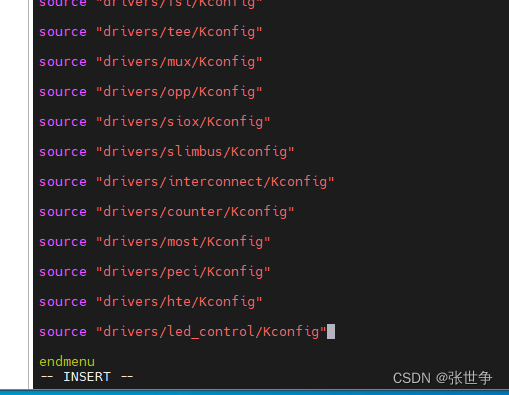
source "drivers/led_control/Kconfig"
- 修改二:还需修改 linux-6.0.10/drivers/Makefile,增加 led_control 的 Makefile 路径

obj-$(CONFIG_LED_CONTROL) += led_control/
- 修改三: 修改设备树文件 vim arch/arm/boot/dts/vexpress-v2p-ca9.dts,增加一个虚拟的设备节点
        led_control@0 {
                compatible = "gpio,led,led-control";
        };
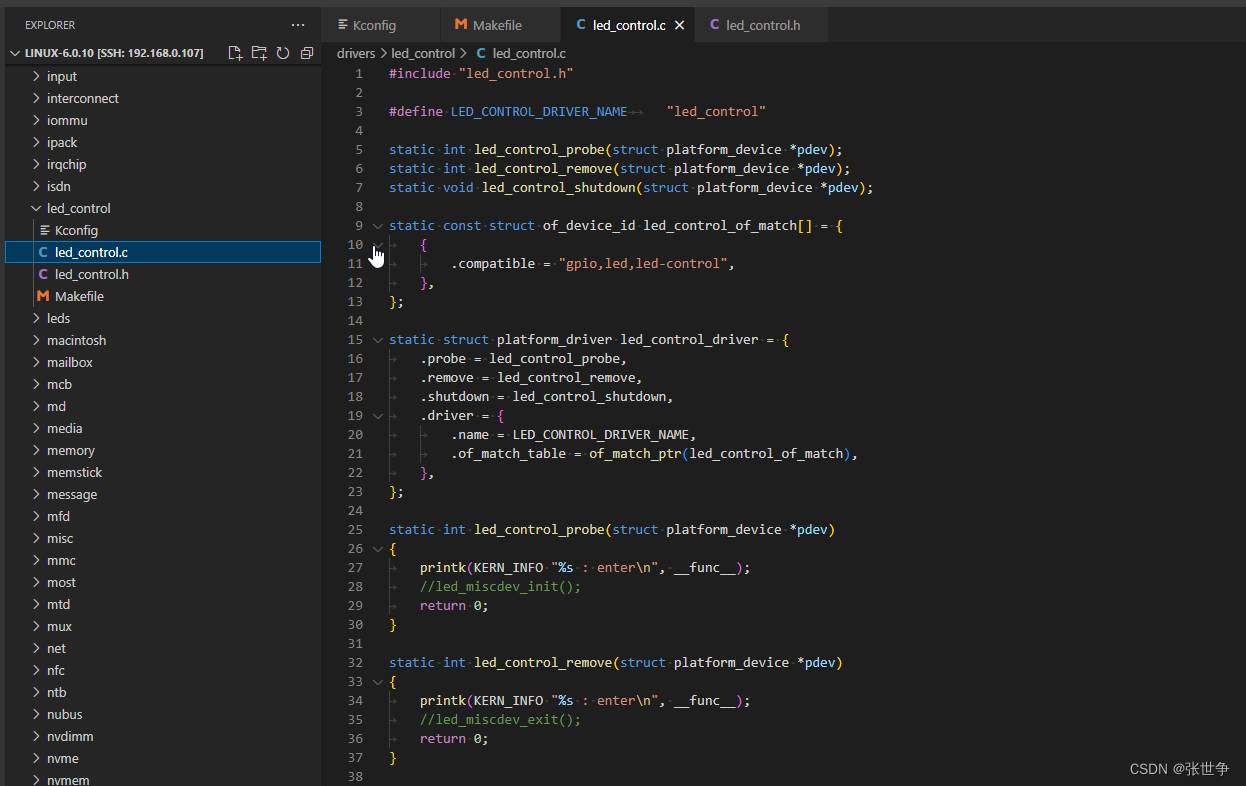
- 备注:可以使用VS Code ssh 连接ubuntu 主机,进行代码的编写
编译
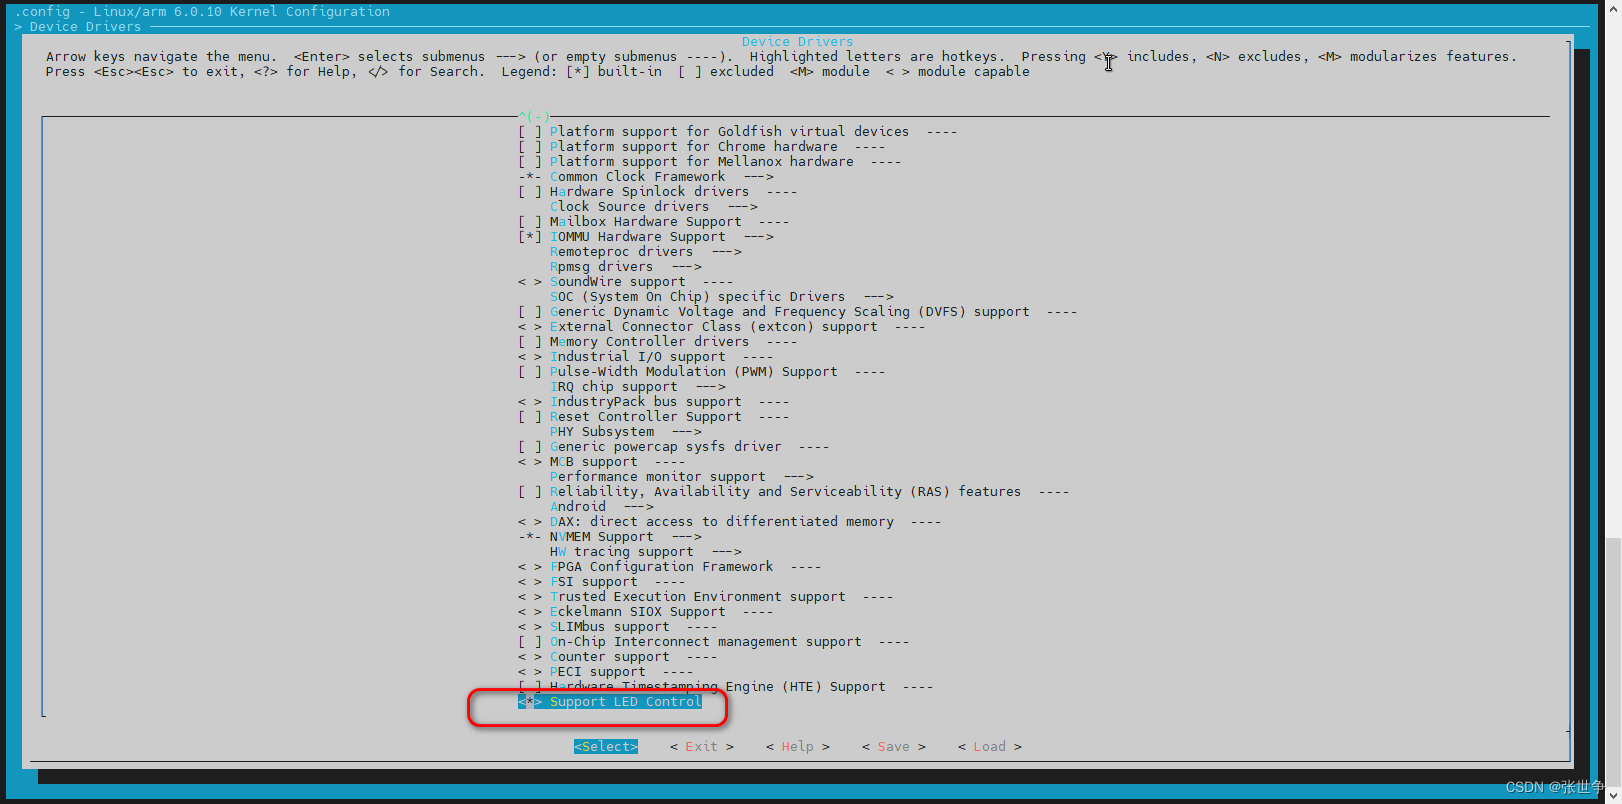
- led_control 属于内核驱动,默认跟内核一起编译,当然也可以使用【模块编译】
- 编译命令:这里使用 qemu
make ARCH=arm CROSS_COMPILE=arm-linux-gnueabihf- vexpress_defconfig
# 默认选择了 led_control,可以 menuconfig 看看
make ARCH=arm CROSS_COMPILE=arm-linux-gnueabihf- menuconfig
## 编译,默认生成 zImage
make ARCH=arm CROSS_COMPILE=arm-linux-gnueabihf- -j8
- 把 内核编译生成的 zImage,放到 qemu 根文件系统中
启动 qemu
-
简单编写个 启动 qemu 的shell 脚本,这样每次就不用输入那么长的命令了
-
vim boot_qemu.sh
#!/bin/bash
echo "---------- boot qemu ----------"
echo
qemu-system-arm -M vexpress-a9 -m 512M -dtb vexpress-v2p-ca9.dtb -kernel zImage -nographic -append "root=/dev/mmcblk0 rw console=ttyAMA0" -sd
-
chmod +x boot_qemu.sh 增加执行的权限
-
启动 qemu ,sudo ./boot_qemu.sh rootfs.ext4.img ,完整的启动命令行为
qemu-system-arm -M vexpress-a9 -m 512M -dtb vexpress-v2p-ca9.dtb -kernel zImage -nographic -append "root=/dev/mmcblk0 rw console=ttyAMA0" -sd rootfs.ext4.img
-
其中 rootfs.ext4.img 是 根文件系统,制作方法可以参考前面的文章
ubuntu 20.04 qemu linux6.0.1 制作ext4根文件系统
-
启动后,发现 led_control 平台驱动 注册成功,并且匹配设备树节点成功,进入了 probe 函数
led_control_driver_init : enter
led_control_probe : enter

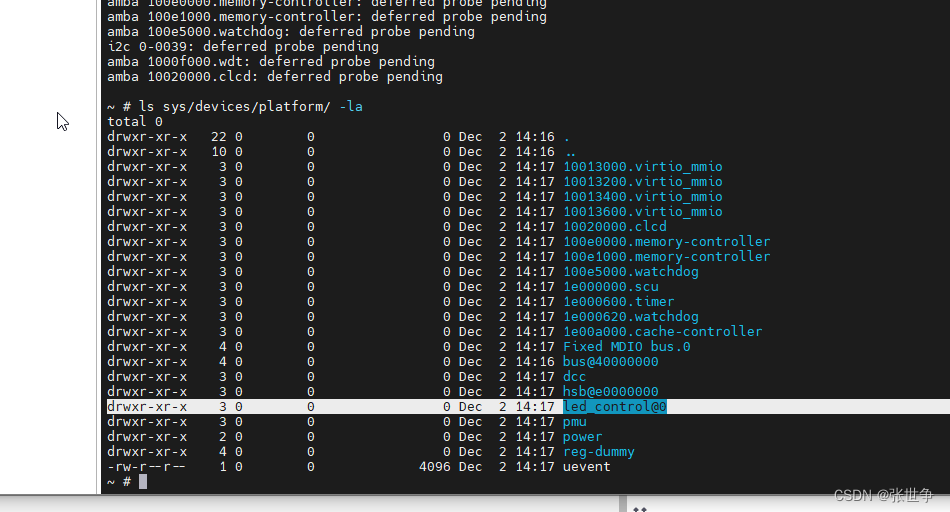
- 进入 Linux shell,查看 platform 驱动的文件 ls sys/devices/platform/ -la,可以找到注册的 platform 驱动
led_control@0
- reboot 时,发现调用了 led_control_shutdown : enter
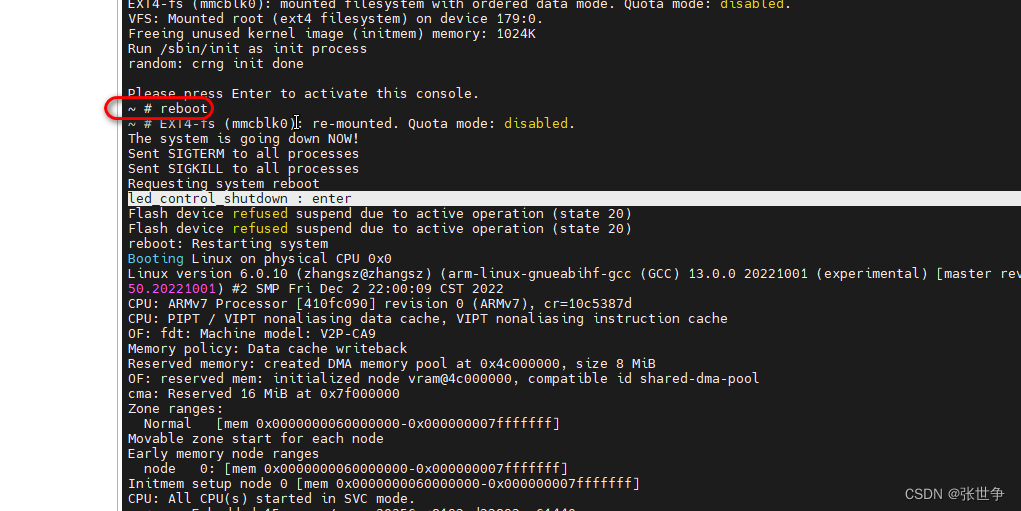
- 以上说明 platform 驱动 注册成功,调用正常
小结
-
Linux 的一些 misc 设备,通过先注册 platform driver 平台驱动,在平台驱动 probe 函数中再注册初始化misc 设备,这是一种很好的驱动开发设计方法,充分利用了Linux 内核提供的驱动模型带来的便利,让驱动开发精简,利于管理
-
Linux 设备驱动还是比较的庞大,需要花些时间与精力耐心研究,才能有所收获
-
- 以上说明 platform 驱动 注册成功,调用正常
- reboot 时,发现调用了 led_control_shutdown : enter
- 进入 Linux shell,查看 platform 驱动的文件 ls sys/devices/platform/ -la,可以找到注册的 platform 驱动
-
-
-
- 把 内核编译生成的 zImage,放到 qemu 根文件系统中
- 编译命令:这里使用 qemu
- led_control 属于内核驱动,默认跟内核一起编译,当然也可以使用【模块编译】
- 备注:可以使用VS Code ssh 连接ubuntu 主机,进行代码的编写
- 修改三: 修改设备树文件 vim arch/arm/boot/dts/vexpress-v2p-ca9.dts,增加一个虚拟的设备节点
- 修改二:还需修改 linux-6.0.10/drivers/Makefile,增加 led_control 的 Makefile 路径
- 虽然 led_control 驱动里面Kconfig 默认选中 【default y】,但是 menuconfig 中找不到这个 Kconfig 配置,需要修改 linux-6.0.10/drivers/Kconfig,把 led_control 的 Kconfig 路径添加进去
- 新建 linux-6.0.10/drivers/led_control/Makefile,Linux 下,默认使用 Makefile 管理文件的编译
- 新建 linux-6.0.10/drivers/led_control/Kconfig,这里增加一个【宏】
- 新建 linux-6.0.10/drivers/led_control/led_control.h
-
-
-
猜你喜欢
网友评论
- 搜索
- 最新文章
- 热门文章
